This is the triangular greenhouse not long after construction.
The design is established but not common. Further images below show that it's
been extended and altered radically since then.
/Capturegreenhouseconstruction.JPG)
It's made up of six long, straight polycarbonate panels, three of them visible from this side, of course, kept in place by long wooden elements with two bolts for each of these. Removing a polycarbonate panel takes only a couple of minutes. The nuts on the bolts are simply removed with a spanner. This summer, when the external temperature has sometimes reached 25 Celsius, I've removed one of the panels. In countries where the temperature is regularly at 30 Celsius or higher, then it's a simple matter to remove more panels - all six panels, in fact. The fate of plants in traditional greenhouses at temperatures as high as this is pitiful, even if the greenhouse is painted with whitewash or the door is left open. I give other advantages of this greenhouse in the section below. One of these advantages is very striking, I think. If you'd prefer not to grow crops over the winter - in an unheated greenhouse, at a time when light intensity tends to be low, not much can realistically be grown - then you can convert the greenhouse into a shed with the greatest of ease. Simply remove the six semi-transparent polycarbonate panels and replace them with panels made of plywood or another opaque material.
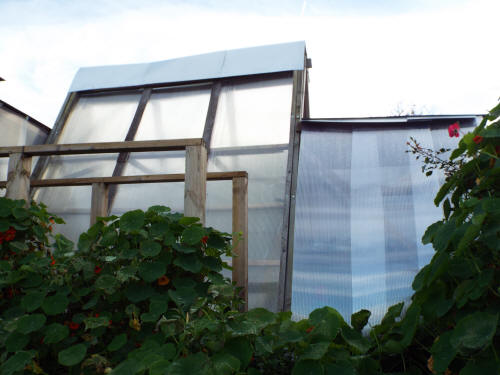
This greenhouse is the structure I designed and constructed to replace a very old structure which has now been demolished after damage by strong winds. The new greenhouse is a prominent, harmonious feature of the skyline of this allotment site.
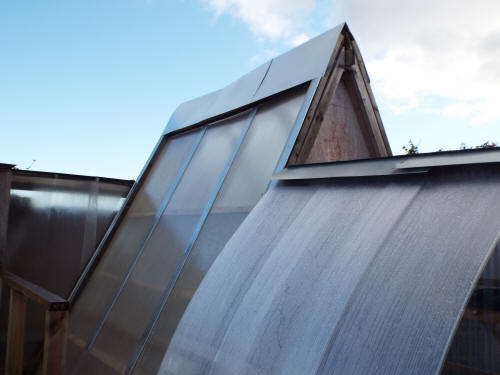
'I covered the horizontal wooden sections at the apex of the greenhouse with inverted V-shaped sheet metal sections -
Later still, I added sheet metal cladding to the wooden diagonal supports:
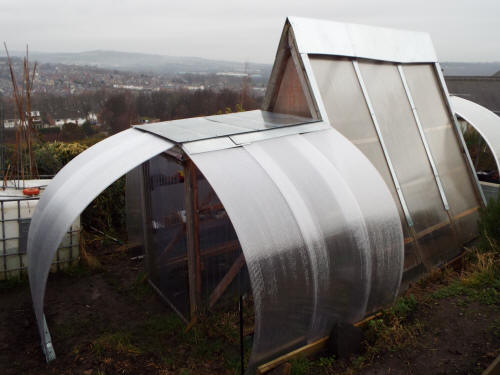
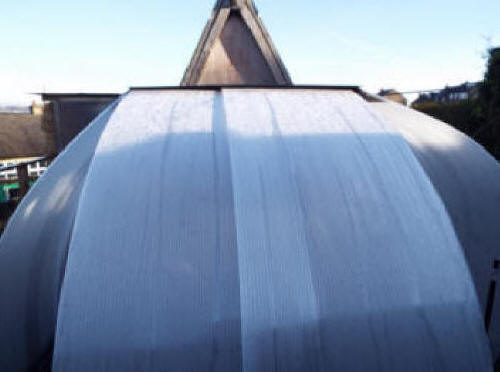
Two curved extensions on the other side of the greenhouse structure, the uphill side:

An addition to the structure. an extension to the main axis, on the left. Photograph taken 21 December, 2017. This forms a porch to the entrance, a better place to shelter when it rains than inside the main greenhouse. And, also, increasing the water-collecting surface area of the greenhouse and taking the water from the sloping sheet metal roofing and the extension itself to ground level, where it can be diverted to the water-storage pond, hidden by the curved sheets to the front.
Below, the new West-facing polycarbonate extension in the centre. On the left, some of the North-facing extension (and some of the straw bale extension, with its flat sheet-metal roof.) To the right some of the South-facing extension, which shelters the small pond. Beyond, the apex of the A-frame of the main greenhouse structure.
The most recent extension is this unfinished section (the straw bales have to be adjusted, gaps have to be filled and the straw has to have coats of lime plaster):
The structure incorporates contrasts of curved form and rectilinear form.
Rectilinear form is vertical or sloping - the sides of the triangular
structure which makes up the central component of the greenhouse composite.
There are also contrasts of material in the surfaces - polycarbonate and
(for the time being) straw. After plastering, there will remain differences
in texture, smooth and irregula,r to some extent.
The four triangular openings, two of them visible above, were
covered with acrylic triangular pieces.


Triangular design (A-frame design) has many advantages.
Structural strength is a very important factor in this country, now that extreme weather conditions have become more common, and in countries where extreme weather has always been a familiar problem. Architects and structural engineers recognize that of all shapes, triangular structures have the greatest strength. Rectangular design is structurally weak, but this design adds an extension with a rectangular framework to the basic triangular (A-frame) component, shown opposite. It benefits from its structural strength. A rectangular structure fixed to a triangular structure is stronger than the rectangular structure would be on its own. Overall, the design has the advantages of triangular and rectangular design. There are horizontal timber elements between the long diagonal timbers, resisting the inward forces exerted by them. These elements are discreetly strengthened with rectangular steel sections.
Ease of erection and relative cheapness are other strengths. The simple triangular shape is easier to construct than other shapes, such as the most common design, rectangular frames up to the eaves and triangular frames from there to the ridge, let alone less common shapes such as domes or geodesic domes.
There are elaborate fixing instructions for the twin-wall polycarbonate sheets I used. The glazing bars and accessories which are needed add to the expense of the construction. I decided to ignore the instructions and to omit the glazing bars and accessories, having confidence in my design. My confidence was justified. The design works perfectly. The simple vertical and horizontal timbers support the polycarbonate sheets, 4m in length, and hold them in place without any problems at all.
The design has other advantages. It's good for water collection, incorporating, unusually, gutters at ground level. It has a very useful feature, never before offered in greenhouse design, so far as I know - fixings for quick and easy attachment of side panels with windbreak, shading material and others. The windbreak and shading material increase its already very strong wind resistance and lower the internal temperature in hot weather. In areas where vandalism is a problem, protective grids can easily be fitted.
Traditional greenhouses are fixed, inflexible structures. The design of this greenhouse makes removal and replacement of components for various purposes very easy. The design makes extending the greenhouse - for additional growing space and additional storage space, for space to sit out under cover - very easy. The design is flexible and versatile to a high degree.
The polycarbonate sheets can easily be removed, for cleaning, for example. For maximum light transmission, cleaning once or twice a year is essential, and is much easier with the polycarbonate removed than with the polycarbonate in situ. When the polycarbonate sheets are removed, it's much easier to apply wood preservative or varnish to the wooden components.
The most important advantage is this: the ability to remove polycarbonate sheets - one of them, some of them or all of them - makes ventilation very easy. In summer, even in this country, external temperatures are high enough to make ventilation a priority. This is a matter I discuss at greater length in the section Advantages of these designs. Disadvantages of traditional designs.
In appearance, the greenhouse is striking - uncluttered, more monumental and modern than something that oozes picturesque charm. It can form a focal point (the height helps here: 3.2 m, 10' 6") or it can form a contrasting feature in a garden which has the old-fashioned look. It will blend in well. The extension is less obviously modernistic, partly for the reason that it's much smaller. It does have a roof of sheet steel, a roofing material with many advantages, including unrivalled durability, and not difficult to use.
I'm convinced, from personal experience, the experience of going to the allotment after a day of strong winds and finding utter devastation, that of all the factors that are important in designing or choosing a greenhouse, ability to withstand severe weather is particularly important, if the greenhouse is in an exposed place, like this one.
No matter what the advantages of a greenhouse, such as masses of interior space, attractive looks or cheapness, if the greenhouse is readily destroyed then all the advantages count for nothing. As well as the photographic record here, there's more in Gardening photographs 4.
Even if the strong winds in this country never reach cataclysmic American speeds, they can easily destroy a greenhouse. Snowfall, again, very moderate, by the standards of the chillier American states, can easily collapse a polytunnel, but in general doesn't damage greenhouses here. Hailstorms, again, are mere beginners in this country, but can still pierce PVC sheets - which is exactly what they did in the case of the old greenhouse during an unusually severe hailstorm. Now that extreme weather conditions seem to have become more common, protection has to be a priority.
A Youtube video which gives a sobering and comprehensive record of greenhouse failures and frailties (a commercially-motivated one) is https://www.youtube.com/watch?v=Tkny6Qgl4O0 The company behind the film, Florian, which happens to produce greenhouses with aluminium frames, is mistaken, of course, to imply that only greenhouses with aluminium frames have adequate strength, or that greenhouses with aluminium frames necessarily have adequate strength.
A very short video (it lasts only 8 seconds) http://www.youtube.com/watch?v=L0rDmXWdUYI is quite dramatic, although the greenhouse here wasn't in a fit state to begin with. It illustrates very well the effect of forces on rectangular structures, the inherent weaknesses of a rectangular structure and the inherent strengths of a triangular structure. In the film, the rectangles become converted into parallelograms, causing complete collapse, whilst the triangles on top of the rectangles stay triangular.
When I decided to take on this allotment, the smaller of two, one of the attractions (just about the only attraction) was a steel framework, about 5m long, which may well have dated from the 1930's or 1940's. The girders - angle irons - were badly rusted, most of the fixings the same, but it was easy to see that it could be transformed into a very useful greenhouse. Once it was covered with PVC corrugated sheets, the kind used for the cloches on this page, then the steel framework withstood all the gales very well.
The winds that led to this remarkable devastation were much less strong than some others which the structure survived with ease - the metal framework, but not all the PVC panels it supported. Demolition wasn't easy at all. The girders were not flimsy in the least and it required an angle grinder powered by a portable generator to cut through them so they could be removed.
I decided very quickly not to buy a replacement greenhouse or a polytunnel but to produce a design of my own, with the emphasis on structural strength. Commercially available structures don't, in general, have the same emphasis, and are regularly wrecked by severe weather conditions, just like the greenhouse here. In this area, commercial greenhouses have suffered a great deal, in some cases spreading some of their component parts far and wide.
The design for my replacement greenhouse makes use of a simple, very strong triangular section. Books on structural engineering discuss the inherent strength of triangles and the weakness of rectangular elements, so easily deformed to give parallelograms.
The diagonals of this greenhouse, the walls, include on each side 3 polycarbonate sheets, with wooden rails holding the polycarbonate sheets in place. Each of these supports is made up of two rails. Nuts and bolts inserted in the wooden supports hold the sheets firmly. The outer rails are wider and load-bearing, the inner rails are narrower and can easily be removed by removing the nuts, from inside the greenhouse, to allow for removal of the polycarbonate.
Polycarbonate has much greater structural strength and impact resistance than glass, let alone the polythene of a polytunnel. A polycarbonate roof would have easily withstood the hailstorm which pierced the PVC roof of the old greenhouse.
Polytunnels are very vulnerable to snow
damage. This greenhouse, with its steep slope,
will shed snow with ease.
This posting from 'Accidental Smallholder'
mentions not just the problem of snow but the
difficulties of erecting a polytunnel:
'Busy busy busy here, so I'm a bit late getting
out into the veg garden to properly assess my
beloved Poly Tunnel but I have finally accepted
that it has to come down.
'Despite my reservations it fared better than
expected in the high winds we can get around
here. What actually did it in was the weight of
all that snow we've had this year.
'The skin is in tatters, some of the hoops have
been pushed into the ground and some are at
angles - even though they are concreted in at
the base. I can rescue the soft fruit (but not
sure where to replant the grapevine).
'It's
quite large, but unsure now whether to erect it
elsewhere and start again. Not sure I can face
all that digging putting a new skin on.......'
Although the main supports of this
greenhouse are long (3.6m) and quite heavy, only
one wooden diagonal support has to be raised at
any one time. This is easily done, after which
it's supported in position by simple means
whilst the support on the opposite side is
raised, before connecting the two at the ridge.
The process is easy even for one person.
Next, supporting horizontal members are added.
Although restricted headroom may seem a problem in a triangular design, when the base and the height of the structure are appreciable, as here (the height of the structure exceeds 3m) headroom is appreciable, and the areas towards the side, where headroom is obviously restricted, can be used for staging, with storage space underneath the staging, making good use of the available space.
The headroom at and near the central axis is much greater than in most greenhouses, but away from the axis falls off rapidly, which is why the outer regions can usefully be devoted to the gardening activities which need staging, and to storage. The storage space in this greenhouse is very great, for its overall size.
The gardening writer James Wong advocates pinching out the growing tip of tomato plants after only one truss has set fruit, allowing the tomatoes to ripen earlier. These small tomato plants can easily be accommodated towards the outside of the greenhouse and can be planted closer together than tomato plants allowed to reach greater heights (the top of the greenhouse or when 7 trusses have set fruit.)
Obviously, whatever headroom is available in the usual design - vertical walls up to the eaves, and a sloping roof up to the highest point, the ridge - is available too in a triangular design. This diagram makes this clear, superimposing the two designs:

The disadvantage is that the footprint is
larger. The greenhouse is unsuitable for growing
areas which are restricted in size. The
advantage is that at the sides, this design
offers usable space for things where substantial
headroom isn't a requirement, eg staging and
storage. Very often, a greenhouse of the usual
design is surrounded by space which could easily
be utilized, and is utilized when a triangular
design is chosen. It's a mistake to choose a
smaller design when there's adequate space for a
larger design. Smaller greenhouses are subject
to overheating. The advantages of larger air
volumes in a greenhouse are well-known.
The most efficient way to use the internal growing space is to take the advice often given to growers, to make full use of the vertical dimension (despite the views of James Wong, it would be a mistake for all the tomato plants in a greenhouse to be small, stopped after one truss.) The height of this design is a notable feature. So, indeterminate tomato plants can be allowed to grow as tall as possible. Even if the higher fruits haven't ripened by the end of the growing season, they will certainly ripen stored indoors. If they are too tall to reach comfortably, this can easily be overcome. I have an aluminium work platform with folding legs which has a height of 490 mm (dimensions LWH are 1100 x415 x 490 mm.) It's very useful for other tasks, such as clipping the higher parts of hedges which can't be reached comfortably standing at ground level.
The polycarbonate sheets are usable for at least ten years, and perhaps for much longer (the polythene of a polytunnel is much cheaper but has to be replaced about every 3 years. Glass is very long-lasting, of course, but is far more easily broken than either polycarbonate or polythene.)
As regards cheapness, this greenhouse design is far from being amongst the cheapest, but of course in this case, like must be compared with like. This is a substantial, not a flimsy, structure. Without specifying individual suppliers, the cost of the separate components, the main ones and the most expensive ones, not all, amounts to this:
6 sheets of Twinwall polycarbonate,
1050 x 3000 x 10mm
= 196.74 GBP.
16 wooden rails 50 x 75 x 3 600 mm
=
95.84 GBP
2 x 3m lengths of rectangular steel section, from a scrapyard
= approx. 10 - 15 GBP.
The principal additional cost is for the polycarbonate of the doors at either end and adjacent parts at the two ends. PVC corrugated sheets can be used instead of polycarbonate. 12 sheets of 660 x 3000 mm are needed in all for the sloping main walls, with simple cutting of two of the sheets and a cost of 132 GBP, bringing down the overall cost by about 199 GBP.
An unexpected advantages of the triangular shape is to do with water collection. The long sloping walls give a much bigger surface area for water collection than in other greenhouses, where water can be collected only in the upper area, above the eaves. Guttering is indispensable for collecting this water but isn't the most attractive of greenhouse features. This greenhouse has gutters at ground level. The disadvantage on a uniformly level site is that water can't be directed into a water butt in the usual way. The solution does require the digging of a hole for a water tank, large or small, and the use of a simple hand pump (the method I use) or a water pump powered by a cordless electric drill to raise the water and direct it into a water butt or other higher-level container. (In this country, Machine Mart sells a Clarke water pump, CCP3000B, operated by a cordless drill which works at a minimum 2 000 rpm, currently for under 12 GBP.) For gardeners in arid climates, the advantage outweighs the disadvantage. Even in rainy Britain, there may still be periods of extended drought, when water conservation becomes very important.
For me, there is no disadvantage. The location of the greenhouse is the upper allotment. The much larger lower allotment has a pond and a large water butt. Water can be directed to these by hosepipe from the guttering, which is at a higher level.
Please see also my page on rainwater collecting (and, also, composting.)
The greenhouse has a very useful feature, not implemented in any commercially available greenhouses or polytunnels, so far as I know. The outer wooden rails have fixings which allow panels to be attached quickly and easily. (3 panels on each of the sloping sides, each 1m wide). The panels can hold a variety of materials, such as mesh material, windbreak or shading mesh. Windbreak material (which can also be used for shading purposes) can be attached if very severe winds are forecast, or left in place during the winter months, increasing the already very high resistance of the greenhouse to strong winds. Shading material can be left in place throughout the hot months of the year, or, in this country, attached during periods of hot weather. Panels with a strong protective grid can also be installed, for defence against vandalism. Solid panels of exterior-grade plywood or other material can be attached to the outer beams (solid panels will also be fixed to the end walls), converting the greenhouse into a shed, temporarily, during the colder months, or permanently. The polycarbonate ensures that this will be a well-insulated shed. More or less storage space (the shed component, with solid panels) may be needed at various times, more or less growing space (the greenhouse, with translucent panels). Whatever the case, this flexible and versatile structure can meet the demands, for a shed, a greenhouse, or part-shed or part-greenhouse, to varying extents.
Views from above the structure:

The basic unit which includes the ridge
board and polycarbonate side walls can easily be
extended. If the growing area is found to be too
small, another unit can easily be added, or more
than one unit.
The greenhouse presents itself not as an almost completely regular, almost mathematically exact structure, but one whose regularity and exactness are modified. Complete regularity and exactness in a structure tend to be sterile. The vernacular - very, very vernaculure - structures to be found in allotments tend to be very irregular, completely lacking in exactness, and this structure is in this tradition as well as well outside it. From least improvised to most improvised, the width of the three broad bands in the main greenhouse isn't a constant, although the three long strips of double wall carbonate do fit. The horizontal timber strips aren't exactly horizontal, or anything like it. Most noticeably, the overlapping pieces of wood which form the top of the structure, below the apex, are obviously improvisational, like so many allotment structures.
I'm influenced by the tradition of allotment building in this country but far more by the irregularity of so many timber-framed buildings, such as the ones at Lavenham. The horizontal timbers of the rectangular extension show the influence of timber-frame construction most clearly. The extension's sheet metal roof shows clearly that the extension is a composite and that the greenhouse + extension is a composite.
A structure of this size can't possibly be forbidding or easily seem inaccessible, so I didn't attempt to make it seem forbidding or inaccessible by excluding the homely look, even though I was determined that the greenhouse should have presence and impact.
In the sphere of practicality, growing crops, making full use of the vertical dimension is often recommended as a good way of making use of limited growing space. Making full use of the vertical dimension is a good way of making use of limited construction space too.
After completing the greenhouse, I turned my attention to its surroundings, making a cluster of objects out of the solitary greenhouse. Even if a building has interest, a sterile environment can detract from the building, although I'd claim that the extension, markedly different from the greenhouse in style, already added to the interest of the main structure. I added trellises, one of them attached to the greenhouse, to be used as a support for French beans and for honeysuckle. I did something about a small pond which was superfluous and quite unsightly, giving it a flat sheet metal covering. This is functional. Its function, setting up 'rhymes' with other sheet metal areas in the vicinity. I don't take the view that if a very small area of an allotment isn't devoted to food growing, then that's wasteful. I'm not gardening as a survivalist. I added a gravel area at one side of the extension and placed a sheet metal container on it for growing ornamental plants, Pelargonium (intended use: a trough for feeding sheep.)
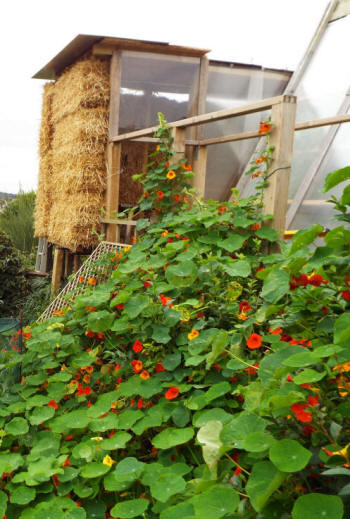
The straw store is for plant protection, but not the protection of living plants. It's designed to store and protect straw bales from rain but it has other functions as well, if required: weed control, provision of weed-free soil and water storage. The straw store also has, I hope, visual impact, as a graceful but strong structure. This version accommodates four straw bales, two of them visible or partly visible here. The straw bale is easily constructed: a polycarbonate sheet is formed into a curve and fastened securely to the ground. It resists strong winds very well.

Below, a view of the right hand unit seen from a distance (the blossom belongs to an apple tree, variety 'Spartan'):

The straw bales stored under cover in the straw-store will retain their appearance, including their enthralling colour, for years but in time the colour will fade. Then, the straw can be used in the allotments, and I find many uses for straw, including the mulching of plants, as a compost material - as a high carbon material to balance high nitrogen materials - and for inclusion in earthworks, which have various functions, including the killing of weeds. But of course, the straw can be used at any time, and replaced by new straw bales. (Straw bales are very easily transported by means of a wheelbarrow, provided the wheelbarrow isn't very small, as well as with a trolley.)
The traw bales here were placed under the existing curved polycarbonate sheets, which I've used for growing courgettes. Since courgettes grow very well in the open, without protected cropping, I decided to use the structure in a different way. The ground beneath the structure, shown here in late April 2020, is fairly weedy and overgrown.

I covered the ground with 'Proplex,' a material I'd recommend for general weed control as an alternative to landscape fabric.

Thin, lightweight steel bars were placed across the space, supported at each end by the low wooden framework visible in the image above, three bars to each of the two subunits. There's a space between the black weed-control Proplex and the ground and a gap between the Proplex and the bottom of the straw bales, except for the area of contact straw bale-steel bars. The gap over the ground allows weeds and other plants to continue growing, until they are killed by light starvation. The organic material forms a mulch on the ground and the ground is kept in a better state than would be the case if the weed-control material were laid directly on the ground. The gap beneath the straw bales allows for ventilation and reduces condensation.
After a year or more, there's weed-free soil beneath the Proplex fabric. The bales and the Proplex can be removed - as well as, temporarily, the polycarbonate sheets, allowing access to the soil. The soil can be removed and added to beds in the allotment.
In time, quite a deep pit can be dug and, after lining it with pond liner, the pit can be used for water storage. The straw store is on the North side of the pond. Until recently, I had a large water store on the South side of the pond. The water could be extracted for plant watering with a pump. Water taken from the pond has some associated disadvantages. Material in the pond can clog up the pond. Tadpoles in the pond are at risk. I still use pond water for watering, with a watering can, but when there are tadpoles present, I have to check the water in the watering can carefully.
My page Structures and techniques: composting, water collecting, water conservation includes this:
A composting structure, like other gardening structures, should preferably have more than one function, if the supplementary functions don't compromise the primary function.
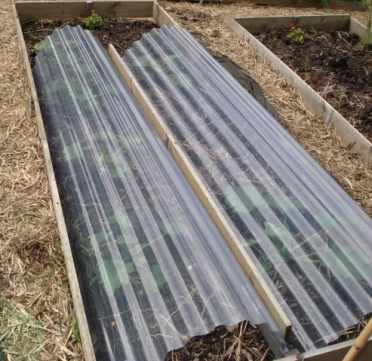
The quick cloche shown here is easily constructed by making use of the boards whose use I explain on the page Bed and board. These boards have great flexibility - they can be removed easily and put in position very easily. They can be used for functions other than marking the boundaries of beds. They can be used to make a cloche but they have other functions as well. For example, they can be used to hold insect netting or anti-pigeon netting above the crop. There's a further example of a structure with multiple functions below, in this case the use of a platform constructed from boards to hold in place 'suspended stacks' for apple storage or storage of wood.
Here, two of these cloches are side by side. These cloches make use of the standard boards.. Less substantial boards can be used than the ones shown on the page. For economy, two 2.4 m x 19 mmm x 100 mm boards can be used for one cloche, three of these for two cloches side by side. The cost is less than £2 per board and a little more than £1 for the stake which supports the board. These will last longer than the PVC corrugated sheets, which have a life of ten years or more (compare with the 3 years for polythene.) I use corolux corrugated PVC asbestos profile, very widely available. It isn't essential to have shorter boards at the two ends, but two can conveniently be made by sawing a 2. 4m board in half - 1.2 m is a convenient width for a bed. These shorter boards make very easy the keeping in place of the ends of the cloche, which need not be transparent.
The ends can be secured without using boards, by means of bamboo canes or tent pegs. Not all the things used in gardening pay for themselves, but all the cloches on this page certainly will, within a fairly short time, given the value of the produce which can be grown under them and the modest cost of the cloches.
If no boards at all are used, then again tent pegs or bamboo canes can be used to prevent the PVC sheeting from slipping sideways, two on each side. The canes should preferably have rubber tops to prevent eye injury. Loops of twine should be connected to the bamboo canes or tent pegs and passed over the cloche so that it's secured against wind.
This structure is now part of a much larger complex. There are various images in the section for the year 2018 on my page Gardening/construction: photographic introduction.
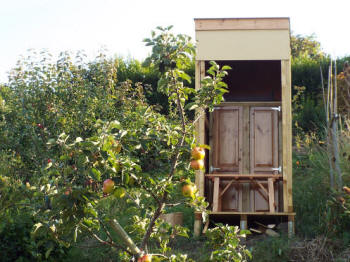
The oak bench can be used for seating, whilst resting and looking, but also as a working surface, whilst using the equipment for pressing apples to make apple juice and cider (in American English, cider and hard cider.) The tree visible on the left is a Bramley's seedling on dwarfing rootstock. It was planted not so long ago, which explains why there are not too many apples on the tree.
The use as a store for produce which requires good ventilation explains why the structure is three-sided, not four-sided (and a three-sided structure has obvious advantages as a convenient viewing platform, for looking at the scene). Obviously, t also allows the interior to be readily seen, with many aesthetic advantages. Eroding the contrast between interior and exterior has advantages. I take the view that this allotment, like other growing areas, has far less to offer outside the growing season. At these times, the more permanent features, such as structures, become even more important than at other times. The doors of the cupboard came from an antiques shop - the kind of antiques shop which resembles a junk shop rather than the completely tasteful (and very expensive) kind. I installed them and varnished them. The varnish is clear and with a satin finish. It's suitable for exterior use as well as interior use. Waterproofing liquid was used before applying the varnish. The interior panels were waterproofed too, and the timbers were waterproofed. If a northerly gale (the open side of the structure is north-facing) blows rain or snow into the opening, the interior is weather-resistant.
The attention paid to aesthetics here hasn't cost me much money or taken up much of my time but in any case, I'm far from regarding aesthetics as a matter of superficial appearance and a matter of negligible importance.
This is an area subject sometimes to theft and vandalism (including arson) but the structure is no more vulnerable than many closed garden structures (the shed I designed has superior security.) I've given a great deal of attention to keeping intruders out of the allotment, with heavy reliance on encouraging the growth of brambles. I've also planted prickly hedging plants and prickly holly trees. The boundary wall with the adjoining school is high and more or less impregnable.
The strucure is now part of a larger complex, shown in the section for the year 2018 on my page Gardening/construction: photographic iintroduction. The complex includes, to the left of the taller store, the structure, with metal tank, used for crushing apples to make apple juice or cider. The hydraulic jack and other equipment, eg racks, not shown here. There's another, lower platform extending forwards, to the left, with containers for growing. The metal container shown here is being used to grow lettuces.
/DSCF1879.jpg)
THe platform extending forwards is now used to support 'suspendec stacks:'
/DSCF1902.jpg)
These can be used for storage of apples, wood and other materials:
/DSCF1961.jpg)

![]() Traditional greenhouses: disadvantages ...
Traditional greenhouses: disadvantages ...![]() The PHD triangular greenhouse, with
extensions
The PHD triangular greenhouse, with
extensions![]() The PHD multi-function straw-store
The PHD multi-function straw-store![]() The PHD quick cloche
The PHD quick cloche![]() The PHD shelter store
The PHD shelter store![]() A shed
A shed
See also other gardening pages:![]() Gardening/construction: introduction,
with photos
Gardening/construction: introduction,
with photos
![]() Gardening techniques:
composting, rainwater
collecting, weeding, digging, no dig
Gardening techniques:
composting, rainwater
collecting, weeding, digging, no dig
![]() Gardening: beds and boards
Gardening: beds and boards
![]() Structures: plant protection and support
Structures: plant protection and support
![]() Some design principles in gardening
Some design principles in gardening
'PHD' stands for 'Paul Hurt Design,' after my own name, 'Paul Hurt.' PHD isn't a business (and I don't have a PhD degree.) The name is just a convenient way of identifying some of my designs.
Almost all the greenhouses to be found in gardens and allotments (but not my own) are traditional greenhouses - sheets of glass or plastic are fixed in a framework made of wood or aluminium.
The traditional design has various disadvantages, but the worst disadvantage is this: traditional greenhouses offer completely inadequate methods of temperature reduction.
Even in the British summer, outside temperatures can be near the limit for healthy plant growth. Inside the greenhouse, temperatures are higher, of course, sometimes much higher. The higher the temperature the greater the growth rate, but only within limits. At these high temperatures, plants can be damaged. Unnecessarily high temperatures also increase the evaporation rate from the soil or compost inside greenhouses, increasing the need for watering.
What can the greenhouse user - one with a traditional greenhouse - do about it? The door can be left open, or other ventilation methods provided by the manufacturer can be used, but they may well be next to useless. Or a kind of whitewash can be painted on to provide shade (What happens if a hot day is followed by a succession of cool days, as can easily happen in our climate? This is a procedure which is so inflexible as to be almost farcical.) And why reduce light intensity just to achieve a degree of cooling? High temperatures inside the greenhouse are undesirable, but high light intensity is desirable.
When the external temperature is well above 22 Celsius, approximately, then it would be best if there were no panels on the greenhouse at all which would increase the internal temperature to damaging levels.
My greenhouse designs do allow this, without any trouble at all, but they have other advantages as well (such as the fact that each greenhouse can easily be converted into a shed, if wished.)