Introduction
A hydraulic apple press
The PHD workbench- innovation is still possible
Introduction
Some of the designs I describe on the site, on this
page and my pages on gardening and construction, such as the
illustrated introduction,
are called 'PHD' designs. 'PHD' stands for 'Paul Hurt Design.' There's no
reference to 'PhD,' the name of the higher degree. I don't have a PhD degree
and I don't have a business called 'PHD.' Starting a business wouldn't be a
realistic possibility for me in the least, for many reasons, including the fact
that I've a range of very different interests which take up a very great
deal of time, as the
Home Page will make clear, and no interest at all, or not much of an
interest, in some of the knowledge and skills needed to run a successful
business, such as financial matters and taxation. Running a business
would take me away from matters which are very important to me. I'm also
past retirement age.
I use 'PHD' simply to refer to designs of mine
which I think are different from established designs, with some advantages.
For example, the low level sheet
metal workbench described on this page allows for much easier and safer handling of sheet metal.
The design has no screw, nail or bolt fixings and the bench is particularly
easy to erect and to dismantle.
A
hydraulic apple press
Some advantages of the apple press, which is suitable
for a wide
range of users. It's suitable for the owner of a small orchard, for a person
with a few apple trees or a person who can obtain apples in quantity - but
it's large enough for (very small-scale) commercial operation.
It's cheap
to construct. The cost is less than 250 GBP.
It's easy to construct,
if the cross-beams are made of timber rather than metal. Wooden cross-beams
will have to be much thicker than the steel cross-beams used in my model,
although thinner wooden beams can also be used - simply use more of them.
More about drilling into metal later. The basic structure is very simple -
paired hollow section steel horizontals, painted black here, and paired
wooden horizontals at right angle to the metal ones. (Alternatively, the
metal horizontals are replaced with thicker wooden ones.). There are four
uprights, not, as in many designs, two. These consist of four threaded rods,
without the need for a separate stand to support the structure. The pressing
has nearly always been carried out at the orchard but here, it's
carried out in a room in my house - excusable, I think. The weather has been
poor.
/2016-11/DSCF0568%20(1).JPG)
The arrangement for halving or quartering the apples and pulping the apple
sections, prior to pressing the pulp:
/2016-11/2016-11/DSCF0582.JPG)
The design makes for a convenient, efficient work-flow. Everything is near to hand.
Apples can be taken from the container, cut into pieces on the nearby
horizontal wooden support, thrown into the scratter (which is nearby) and
ground into pulp, which falls into the tray, all without unnecessary
movement. The only time that it's necessary to move from the spot is to
operate the wheel of the scratter (if a helper isn't available.)
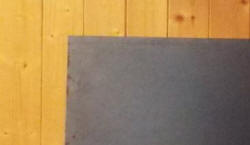
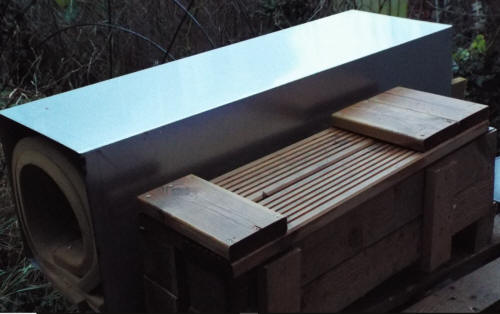
The
wooden board can be placed on the horizontal members of the upper level,
which form a flat surface, once two smaller wooden horizontals, provided
with clips, have been put in position. The bin is supported by a metal bar (inside the larger
hollow steel section)
which can be extended. Later, it's returned to its original position. It
gives extra structural strength to the larger steel section. On the lower
level are some
of the various items that will be used during pressing.
/2016-11/DSCF0559%20(1).JPG)
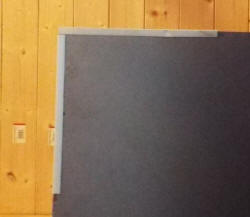
During the apple pressing process,
it may be convenient to have a larger working surface available than the
small wooden rectangle shown above. The large wooden tray can be taken from
the lower level and placed on this higher level. Obviously, it may come in
useful at other times, and for other purposes, throughout the year, in fact.
/2016-11/DSCF0555%20(1).JPG)
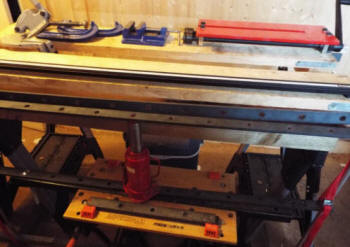
This photo shows some of the other components of the press, the
hydraulic bottle jack and the pressing sunface. It also shows some optional
additions to the structure. As well as the four main threaded rods, four
smaller diameter threaded rods can be used, attached to two small metal
sections. Two of these smaller rods are shown here, in front of the main
rod. These are necessary if a higher capacity jack is used.
/2016-11/DSCF0565%20(1).JPG)
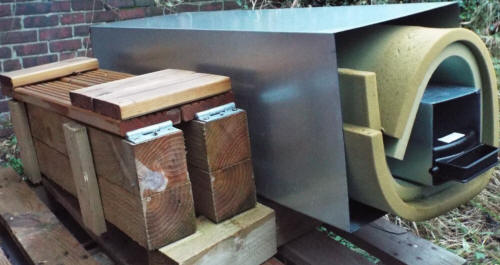
The press can be
used on uneven ground as well as flat surfaces, if the position of the nuts
is adjusted. This will often be useful in an orchard. If the press is placed
on a hard surface, as here, castors can be fitted very quickly. The two
sub-units at the ends of the top hollow section - they contain the four
smaller diameter threaded rods - are removed by loosening four nuts. Here,
the two units are shown against a door.
/2016-11/DSCF0573%20(1).JPG)
Four casters are screwed into the lower ends of the threaded rods and
then the two sub-units are put back at the ends of the steel horizontal. One
of the castor-pair at the end of one of the sub-units. One castor in each
pair has a brake to stop movement when it's applied.
/2016-11/2016-11/DSCF0584.JPG)
If castors aren't used, the press can be moved short distances by two
reasonably strong people. The press can be dismantled easily, simply by
loosening nuts or pulling away pieces with clips, and it can be re-erected
very easily. None of the separate pieces are very heavy. The heaviest are
the two hollow section horizontals. Each one weighs about 2.8 kg.
The main items to be bought or acquired, if the version with metal
cross-beams is constructed. The prices given are the approximate ones I
paid, except for 12+mm threaded rods (I used the ones I already had, which
happened to be stainless steel - much more expensive than the price quoted
below. The cheaper ones are completely suitable.
The most expensive
item by far is the one given first:
4 sheets of HDPE sheet for the
racks of the press (many people would use 5 or perhaps 6): 72 GBP. Plywood
sheets can be substituted - much cheaper and perfectly usable, even if less easy to keep clean and
less durable.
Threaded rods, 16mm diameter: 19 GBP for a pack of 5 (only 4 are used.)
Threaded rods, 12mm diameter (if the optional units shown in the photo above
are attached to the ends of the upper metal cross-beams): 8 GBP.
Two
lengths of hollow rectangular section structural steel: 15 GBP.
Bottle
jack (I used an 8 tonne hydraulic jack, the minimum size recommended for a
press of this size): 25 GBP.
Curtain net, to make the cloths which are
filled with apple pulp in the former before pressing: 9 GBP.
Waterproof,
food-safe cloth (manufactured by Pro-care), used for lining the tray, with
an outlet to direct the apple juice to a storage container (other options, a
stainless steel tray or varnishing the tray with a suitable product): 30
GBP.
Timber board, to construct the tray (a piece was left which can be
used for the support for chopping boards when the apples are halved or
quartered): 30 GBP.
Other wood, to construct the wooden horizontal
members of the frame, the top plate and the form (I used ordinary softwood,
spruce): estimated 15 GBP.
If castors are used, these will add to the
cost. I paid 40 GBP for the four castors.
In addition, varnish was used for the wood
and metal paint for the rectangular section. I used two convenient products,
very easy to apply, Ronseal diamond hard Interior Varnish and Hammerite
direct to rust metal paint. Costs not given here: only a small part of the
contents of the containers had to be used.
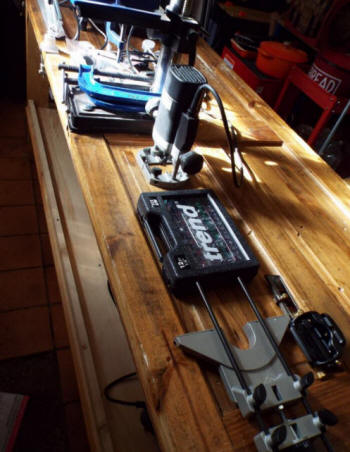
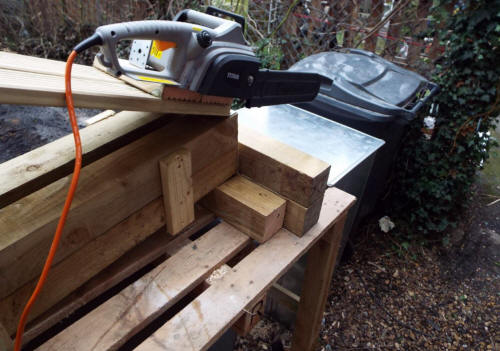
It's easy to
construct the version with these metal cross-beams, if a bench press or larger
press is available for drilling the holes. Ordinary
portable drills can also be used, provided they have the necessary power
and can take a 16 mm drill bit, and provided the person doing the drilling
is cautious but confident - when the drill bit begins to break through the
metal, there are large torque forces and the drill has to be held very
firmly.A
The PHD workbench - innovation is still possible
More images of the workbench in the section my
workshop.
No innovations are possible in workbench design and construction -
everything that could have been thought of has already been thought of.
That's a common opinion, but I don't share it. I'd claim that the PHD
workbench does include innovations, even if the innovations aren't dramatic.
Of course, I don't claim, of course, that an improved workbench necessarily
leads to improved woodworking or metal working.
There's general
agreement that a good workbench has to be solid and heavy, to provide a
stable base for holding the wood or metal which is being worked. I don't
dispute that. I think the same. The workbench I've designed is solid and
heavy.
Manufacturers charge much more for very solid and heavy workbenches than
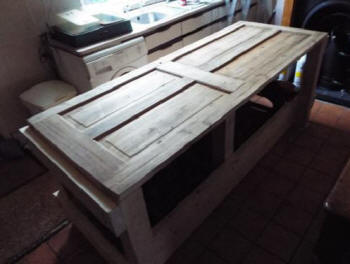
for very light and flimsy ones, but this one is cheap to construct. I used
an old door for the top of the bench - it had been thrown out and put in a
skip - together with a plywood sheet, but if a free-of-charge door can't be
found, the cost of the workbench is still very low. For reasons I explain
later, I put the door on top and the plywood sheet underneath. Anyone who
wants to build a similar workbench and has a usable door is completely free
to do it differently.
The door has an obvious flaw - there's a hole at one side where the lock
was. The standard way of dealing with the hole is to use filler or to plug
the hole with a circular section of wood, although it's difficult to
disguise holes of this size. The hole can be hidden very easily, for
instance, by bolting a pillar drill in this area (a thick support is
underneath the bench here.)

Workbenches which are solid and heavy are difficult to move. Shifting
loads of this size is a job which should preferably be avoided. Changed
circumstances may make it essential to move a wonderful and very
substantial workbench some distance. There are any number of reasons - a bad
leak in the roof above the workbench, the purchase of a new piece of
equipment which would be better off in the place where the workbench is now
...
This workbench is very easy to move, as I explain now. Workbench design
doesn't have to be like tent design - the ideal backpacking tent is very
spacious, very light, very strong - capable of withstanding gales - very
cheap, very easy to erect and very easy to dismantle. In tent design, far
more than workbench design, the problem of incompatible ends is a real one.
In workbench design, it's much easier to achieve advantages without
corresponding disadvantages.
We can move the workbench within the workshop or working area very
easily, without taking it to bits. We can move the workbench longer
distances by taking it to bits, something which is very easy. It's just as
easy to assemble it.
How do we move such a heavy object within the workshop or working area?
Answer, the bench has a jacking point. Place a heavy hydraulic jack or a
small and light hydraulic bottle jack or a non-hydraulic vehicle jack under
the jacking beam, at more or less the centre of the beam. I see advantages
in equipping workbenches, like motor vehicles, with beams which are strong
enough for the purpose. These beams are at the ends of the workbench, not
the sides, of course.


When one end is in the air, attach blocks to the two legs - or supporting
members - of the workbench at this end. The blocks are equipped with
heavy-duty spindle castors. These castors have brakes, so that once the
other end is raised, the castors don't move. Operate the jack so that this
end is gently lowered and the castors take the weight of the workbench. Go
to the opposite end and do the same. There's no need for the castors at this
end to have brakes. Once this end has been gently lowered, the workbench is
mobile.

Why is this workbench so easy to erect and dismantle? Primarily, because
it doesn't rely upon mortice and tenon joints. The pieces which make up the
workbench are either bolted together, with carriage (coach) bolts or, in
some cases, where strength isn't a necessity, by means of screws, Unlike
nails, of course, screws can easily be removed. The screws used in this
workbench are substantial ones of M12 diameter, but are easy to insert and
remove, with the aid of a club hammer.


.jpg)